Archive | cooking & baking RSS feed for this section

Phomidable Vegetarian Phở for Phour

19 Jan

Hogtown has no shortage of Vietnamese restaurants; when I lived in Riverside my favourite of which was the adorably decorated Hanoi 3 Seasons (named after the city that invented this delicious noodle-centric soup). Their Cha Ca– grouper prepared in a dill and shrimp paste–is absolutely fantastic. But, seeing as it’s winter and we’re all hibernating (read: lazy) I thought I might share my take on an easy phở recipe that takes about twenty minutes from peeling onions to degustation. And best of all: It’s pretty healthy too! (Despite the Hoisin sauce, which packs a mean 100 cal/2 tbs.)

Necessary Foodstuffs for the Main Event

  •     3 cloves of garlic
  •     2 small onions
  •     1 tbs licorice root (this is just what I had, it can be substituted for star anise or regular anise or tarragon)
  •     3 sticks of cinnamon
  •     1 tsp of grated ginger
  •     6 cups of veggie broth
  •     1/2 block medium-firm tofu
  •     1/2 pack of vermicelli noodles (I used the red package of Banh Pho noodles from Thailand)
  •     A medley of veggies (a.k.a. cleaning out the back of the produce drawer): 1/2 green pepper diced, one medium carrot julienned, 6 mushrooms sliced, 1 broccoli head chopped into florets

Garnish

  •     Beansprouts
  •     Red chili peppers
  •     Lime
  •     Basil (preferably Thai)
  •     Mint
  •     Green onions

Lezz Git Cookin’

  1. Dry fry the licorice root, cinnamon.
  2. Add diced onions, crushed garlic and ginger. Sauté until silken.
  3. Add veggie broth.
  4. Bring to a boil.
  5. Throw in ALL THE VEGETABLES! (And the tofu.)
  6. Wait until the boil resumes.
  7. Throw in the noodles.
  8. Wait 6 minutes.
  9. Dish ‘er up.
  10. Serve with a plate of  garnishes and let everyone doctor up their dish.
  11. Don’t forget the Hoisin and Sriracha (chili paste of the gods)!

A 30-Minute Home-Made Pizza that’ll Arrive Faster than Dominos and Taste Thrice as Delicious

8 Jan

Most Canadian pizza chains are the pits. Dominos went through this whole makeover in the US because their crust tasted like cardboard and their sauce was both too bland and too sickeningly sweet, but in Canada we’ve had no such luck. The pizza chain owned by the vehemently pro-life Tom Monaghan hasn’t changed a lick north of the border. (Although they do have a half-assed new app that makes ordering pizzas…fun?) I have the same criticisms for Pizza Pizza: awful crust, awful sauce, awful toppings. So, here at casa Marmaduke (what we’ve nicknamed our new digs) we’ve decided to boycott the big chains and make our own pizza. But seeing as we’re all busy people, we don’t always have time to make our own crust. (Although Yves does have a great recipe that substitutes beer for yeast, which I promise to share.)

What You’ll Need:

$2.00 pre-made dough from No Frills
1 onion (mere ¢ents!)
3 cloves of garlic ¢
1 handful of kalamata olives, half for the sauce and half to garnish the pizza
1 tbs of capers  ¢
1 can of crushed tomatoes ($1.00)
2 tbs oregano
1 tbs thyme
1 ball of mozzarella ($2.50)

What We Used to Garnish:

Eggplant, cut into slices, brushed with olive oil, salted and baked at 375· for 15 mins, flipping once ($1.00)
4 mushrooms ¢
1 banana pepper ($0.25)
1 tomato sliced ($0.35)

The Steps

  1. In a deep pan sauté diced onions & crushed garlic until silken.
  2. Throw in half of the olives, the capers, the crushed tomatoes, and 1 tbs of thyme, 1 tbs of oregano and let simmer for 15 minutes on low.
  3. Decant sauce into a bowl, and with a hand blender, and blend away!
  4. Oil your pizza tray (we used olive oil), then stretch out the dough, and sprinkle with 1 tbs of oregano.
  5. Sauce up the pizza!
  6. Grate the cheese and sprinkle!
  7. Adorn with garnishes!
  8. Baked our delicious disc of molten-cheesy goodness at 375· for 20 minutes, and then we broiled it for 5, but you should watch your pizza like a hawk while it broils.

Enjoy!

Lady Lazarus and Cooking with Wine

3 Jan

Happy New Year everyone!

Today’s recipes are a triple wine threat of deliciousness. We threw a New Year’s bash chez nous and found a number of half-full wine bottles in the morning. This is how we wasted not and wanted not. What we’ve got for you today: red wine-stewed apricots for a special punchy manhattan, mussels apocalypse with subtle anise undertones & we-cleaned-the-fridge risotto, to, of course, accompany the mussels.

Let’s start off the feast with a Mad-Men approved aperitif, inspired the lovely folks at The Ace on Roncesvalles.

  • 1 Package of dried apricots $5.00
  • 1 cup white sugar
  • 4 cinnamon sticks
  • 3 star anise stars

Enough red wine to drown your deliciousness.

  1. Put everything listed above in a pot. Put ‘er on the stove and boil down.
  2. Now that your apricots are plump with wine and spices, throw one in a lowball glass.
  3. In a shaker make your typical manhattan (we do 2 shots of Bullet, 1/2 shot of red vermouth, 3 dashes of bitters, and a table spoon of that reduced wine mixture, shaken over ice).
  4. Yum! And, if you’re feeling sassy, adorn with a cinnamon stick.

(Recipe thanks to our household mixologist, Darcy Streitenfeld.)

Mussels Apocalypse

  • 2 lbs of fresh mussels at $2.50/lb
  • 1 head of fennel at $1.50
  • 2 onions at mere cents!
  • 4 cloves of garlic, for price see above
  • a half can of stewed tomatoes $1
  • a fist of of curly parsley $1.50
  • a half bottle of white zinfandel
  1. Heat some olive oil in a tall broad frying pan (make sure you have a lid lying around somewhere), throw in the onions and garlic and saute until silken.
  2. Cut Fennel tops off and reserve. Cut off the knotty bottom and toss. Cut width wise, and then lengthwise. Then cut into thin (0.5 cm) strips.
  3. Throw fennel, tomatoes & wine in and let simmer, lid on to ensure minimal liquid loss.
  4. After 25 minutes of simmering throw in the mussels, throw that lid back on and shake the pot while on the burner to ensure every last mussel gets a blast of heat and decides to yawn nice and wide for easy mange-ing later.
  5. Try to time it all so that the mussels are the last dish you prepare, they get a little leathery if forced to sit out.

We-cleaned-the-fridge Risotto
(No prices included because this dish was the result of a fridge and pantry clean.)

  • 2 onions
  • 3 garlic cloves
  • a half of a buttercup squash
  • a half of a fennel bulb
  • 2.5 cups of arborio rise
  • 3 cups of veggie stalk
  • 1 cup of white whine
  • butter, olive oil (to coat pan)
  • 1 tbs of sage
  • 1 tsp of saffron
  1. Onions, garlic butter, olive oil and action!
  2. Add buttercup squash, peeled and diced.
  3. Add diced fennel bulb. (And the spices.)
  4. Saute for 10 mins.
  5. Add arborio rice.
  6. Add the wine and stir.
  7. Once the wine has been absorbed start adding (one ladle at a time) the stalk, stirring until the liquid is absorbed and then adding more liquid. Keep the dish on a medium-low heat. After 20 minutes start tasting the risotto as you go; it’s done when the rice is soft and delish.

For platting:
In a broad bowl put down a bed of risotto, then a handful of mussels with some sauce and fennel. Finally, garnish with the fennel fronds & a sprinkle of parmesan & a crack of pepper.

We added shrimp because we had to stretch the dish to accomodate some unexpected dinner guests.

Great Eggspectations

16 Dec

Now that you know how to choose fresh from foul eggs, you need to learn the tricks of preparing the perfect egg.

boiling egg

Boiling eggs is a tried, tested, and true method of cooking eggs and perhaps the most elementary way to prepare proto-fowl, but even something as simple as boiling an egg can be complicated—eggs crack, they over cook, they undercook, and they get discoloured. This quick and elementary guide will provide you with tips and techniques for faultless eggs every time.

Soft-boiled

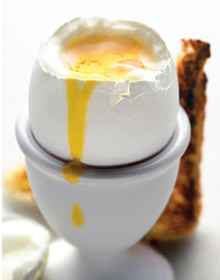
runny soft-boiled egg

Soft-boiled eggs are a difficult to time perfectly. This is complicated by the fact that not everybody’s idea of what exactly constitutes a soft-boiled egg synchs up.

Wait till the water comes to a boil, and then turn the water down to a simmer; too roaring a boil and your egg might get cracked on the bottom of the pan. Cradle your egg in a spoon and sink it down to the bottom of the pan. Just dropping your egg into the pan nearly guarantees a crack.

Generic soft boiling times
  • For a medium sized egg: 3 minutes for runny; 5 minutes for a medium-boiled egg (the yolk runs a bit in the centre, but everything else is pretty much solid). For large eggs add one minute to these cooking times, and for extra large eggs add one more minute to the cooking times.

medium soft-boiled egg

Plunge the egg into cold water after removing it from the pan. This will stop the cooking process and keep the egg at your desired runniness.

Hard boiled

Unlike soft-boiled, the timing with hardboiled eggs is a little more flexible. Thus, if you are in a rush, you don’t have to wait for pot to come to a boil before plunging the egg into the watery depths (just add a 3 minutes to the cooking time). Once the water is boiling, reduce your heat to simmer, again insuring your precious cargo doesn’t crack.

  • Boil your egg for 10-12 minutes (judge based on sized).

Once the eggs are boiled submerge them into a cold bath promptly. But why you ask? Boiled eggs can’t over cook can they? Well, not in the same way that soft-boiled eggs can overcook, but the eggs can develop dark green rings around the yolks if cooked on too high of a temperature or cooked for too long.

overcooked franken-egg

What are those dark green rings that appear around yolks? When eggs are overcooked, cooked at too high a temperature, or the cooking water is iron rich, then a green ring appears around the yolk. This green ring is a manifestation of the iron and sulfur compounds in the egg. It doesn’t affect the taste, but it’s unsightly for some egg dishes, and over cooking does compromise the integrity of the egg’s protein. Ultimately, it’s just not optimal.

So, what if my egg did crack, do I need to start over? Nope, if there’s a small crack on your egg just add a little vinegar to the cooking water. Vinegar prevents the egg white from seeping out of the egg. A common reason eggs crack is due to heat expansion. Rather than throwing your fridge cold eggs in a pot of boiling water, warm them up a bit! By placing your eggs in warm water for a few minutes while the water is coming to a boil you will insure crack free eggs (nearly) every time.

Is there ever a time I should crack my eggs? Some people like to put a small puncture with the tip of a knife into the air cell of the egg to reduce the likelihood of cracking. I think this is nonsense and leads to more cracked eggs and undesired omelets than necessary. There is one time that cracking your egg is essential: before allowing your hard boiled eggs to cool in a bath of cold water. Cracking the egg before cooling it will make future peeling a breeze.

AvocaDo’s and Don’ts

8 Nov

Avocados need to be seduced. You can’t just pick one up, cut it open, and have at it. No, that would be too simple. Avocadoes are a complicated fruit that demand perfecting timing, a little coddling, and a few sweet caresses. Undress an avocado too early and they’re less appetizing than styrofoam, too late and they’re nothing but a pit in an oversized avocado hide.

Here’s my quick and dirty guide to avocado courtship

Which kind of avocado?
Over the past few years different cultivars have started showing up in North American stores, from the oversized behemoths to the “slimcado” that promises all the flavour with half the fat, but which avocado’s best?

Hass, Fuerte, and Bacon are the three most common store varieties. Hass has a rich taste and strong flavour, whereas Fuerte and Bacon have subtler, lighter taste. Hass has a robust flavour and a long shelf life, it is best to have around the house for sandwiches and salads, but both Fuerte and Bacon make a meaner avocado milk shake. For the casual ‘cado consumer I recommend picking up the Hass. One great thing about the Hass is that it’s communicative; unripe Hass is a dull green, but when it’s ready to be peeled it darkens to a purplish-black. The Gwen variety is similar in shape and taste to the Hass, but doesn’t change colour when ripe. For a comprehensive avocado glossary visit avocado.org.

this hass is unripe

Patience Is A Virtue
I know you want your avocado ripe and ready at the store, but store ripe often means black and blue. Fruit etiquette is slipping, and most store goers have no problems poking, prodding, and squeezing. If you select a firm ‘cado you’re less likely to end up with a fruit that suffers from a history of store abuse.

Strategy

But now I have a rock hard fruit and the party’s in two days! Don’t fret; there are ways to coax your fruit into ripeness.

  • The easiest strategy to induce ripening is to close your avocado in a brown paper bag with a few apples, bananas, or tomatoes, and store in a warm, dry, place for 2-3 days (like on top of the fridge). Why does that work? Well, the aforementioned fruits naturally produce a lot of ethylene gas allowing you to trick your fruit into ripening. Ethylene is a hormone in plants that regulates life functions. Ethylene gas is also synthetically manufactured to help the agriculture industry increase yields by producing speedy crops.
  • Even faster? I don’t particularly love this trick because it’s a little sloppy, but some people rave about it. In a small zip lock bag place your avocado and half a banana peel. Close in a drawer for one to two days.
  • Faster still? Some people will tell you it’s ok to put your avocados in the microwave on the defrost setting. This is not okay. Make another recipe and wait until the avocados naturally ripen. Microwaving avocados may soften them slight, but they’ll be flavourless.
  • Not in a Hurry? Or maybe you just don’t have time, a paper bag, or spare apples? You can leave your avocado out and wait 3-5 days, or just wrapping the an avocado in newspaper, and placing it in a dry, warm place, will help aid in speeding up the ripening process.

Is it ready yet?
You can always do the pressure, or squeeze, test. The skin should be firm, but the flesh underneath should yield to pressure. Another way to get your avocados to confess their ripeness is the stem test—this test also avoids unsightly bruising. If the stem gives when you poke it gently the fruit is ripe.

this hass is ripe


Oups You told me to leave them in a brown paper bag on top of the fridge and now I’ve forgotten them. If you allow your avocadoes to over ripen they will develop dark veins and brown age spots, but they’re still usable. Especially for guacamole purposes.

Leftovers I don’t want to eat the entire avocado, but if I put it in the fridge it’s destined to turn brown and unappetizing. The avocado starts to turn brown due to oxidization. A quick and dirty way to keep your avocado fresh for later is to spread a thin layer of lemon juice, just a squirt, on the exposed flesh and wrap fruit in cling film. Make sure that the cling film is pressed tightly against the exposed flesh, keeping air out and flavour in.

  • It’s a kitchen myth that putting the avocado pit with the fruit will help it stay fresher longer. Leaving a pit in a halved avocado will keep it fresher longer because there is less fruit exposed to the air; however, if you take the pit out and put it back in it will have no impact on the fruit’s freshness.

6$ soup to feed six

22 Oct

The skies are darkening, the trees are shedding, and Torontonians have elected Rob Ford as mayor of Toronto. Now, I don’t want to alarm you by screaming that the sky is falling, but it may just be the apocalypse. It’s time to withdraw all your money from the bank, hoard it under your mattress, and start fortifying your apartment against the inevitable onslaught of zombies. Or, you could just curl up with a big homemade bowl of tomato soup, a grilled cheese sandwich, and accept that winter’s on its way.

TOE-MAY-TOE/TOE-MAH-TOW SOUP

INGRIDIENTS

  • 1 large yellow onion (30¢)
  • 1 garlic clove (20¢)
  • 10 medium sized tomatoes (Just grab a one dollar bag from the discount vegetable section of your supermarket. It doesn’t matter if they are wrinkly or dappled, they’ll taste fine, I promise.) (1.75$)
  • 3 cubes of bouillon (vegetable or chicken, to your taste) (75¢)
  • 5 cups of water
  • 1 bunch of fresh basil (Herbs are one place where splurging is totally kosher.) (1.50$)
  • parmesan cheese for garnish (1.50$)

STEP 1 : peeling tomatoes

  • Bring a pot, large enough to totally submerge all your tomatoes, of water to boil. Submerge all your tomatoes in the water. Let stand for 3 minutes.
  • While your tomatoes are boiling prepare a cold-water bath for your tomatoes. Place the cold-water bath in the sink, under the tap.
  • With a slotted spoon gather your tomatoes and submerge them in the cold water bath. To ensure the water stays cold leave the tap open on low.
  • The tomato skin should now be easy to peel.
  • Time to peel and core your tomatoes!
  • Reserve on the side

STEP 2: Don’t cry!

  • Coarsely chop your onion.
  • Press your garlic.

STEP 3: Playing with fire

  • In your biggest pot bring 2 tbs of olive oil to frying temperature.
  • Add your onion and garlic and sauté until translucent.
  • Add tomatoes, water, & bouillon.
  • Turn stove top down to a simmer, and let simmer for thirty minutes.

STEP 4: Get your soup on!

  • Get out your hand blender and puree to texture that pleases you. I like mine very homogenous.
  • Add the basil, finely chopped.
  • If you are inclined, feel free to add some milk or cream to taste, but this is not necessary.
  • Salt and pepper to taste
  • Serve into bowls and garnish with parmesan.

Last Leg Blueberry Pie

3 Oct

As summer rolls to a close, it becomes very hard to say no to behemoth boxes of blueberries. Maybe it’s that old hibernation drive that makes moderation become such a foreign concept, but they’re so very economical and so very delicious! Who could say no? Now, I can manage to inhale my fair share of the blue delectables, but eventually the box gets pushed to the back of the fridge. A few days later, when my interest is re-piqued, the berries, thanks to the heat, have become a minefield of rotten berries mixed with still perfectly firm and succulent sister berries. Most people see the mould and immediately go for the garbage, but while these berries might no longer be picture perfect, I promise you they’ll still make a killer pie.

Blueberry cheese crumble

You will need… for the dough
– 1 cup of butter
– 2 cups white all purpose flour
– ½ cup of sugar
– 1 pinch of salt
– Rind of one lemon
– 1/8 cup cool water (if needed)

You will need… for the crumble
¾ cup flour
– ½ cup rolled oats
– 1 egg yoke (whisked)
– 1/3rd of the end dough

You will need…. for the filling
– 4 cups blueberries (roughly)
– ½ cup pressed cottage cheese
–  I use Harmony Organic . Great product & great people.
– 2 tbs corn starch
– 1 tbs flour
– 1 tsp lemon juice
– ¼ cup brown sugar
– ¼ cup white sugar

You will need… from your kitchen
– 10 inch pie plate, 2 inches deep
– Tin foil
– A handful of rice
– Mixing bowls & implements
– Cling wrap
– Rolling pin

Let’s begin with the crust, since that will need to chill for a while after preparation.
THE DOUGH
1. Combine all the dry ingredients (flour, salt, sugar) into a homogenous white mass.
2. Add lemon rind to dry mixture. Mix well!
3. Cut butter up into about twelve small cubes and add to dry mix. Get your hands right in there and combine the butter with the dry mix until it manifests into dough. If you find the mixture is a bit too desiccate, i.e. you can’t get one the dough to combine together into a single mass, add a bit of water.
4. Separate the mass of dough into two balls. One ball of dough should be roughly 3/4 of the dough, the other 1/4. Roll both masses of dough into two seamless balls and place in cling wrap. Reserve in fridge for later. They should remain in the fridge at least 15 minutes.

THE FILLING
1. Go through the berries and pick-out all the moldy soldiers. Wash and repeat.

2. In a mixing bowl combine berries, cottage cheese, sugar, lemon juice, cornstarch, & flour. Gently mix with hands insuring everything is evenly distributed.

THE BOTTOM CRUST
1. Spread the cling wrap on the counter to cover an area equivalent to approximately one metre by a half metre. Sprinkle with flour.
2. Get out your chilled ball of dough (the larger one, the smaller can remain in the fridge) and place it in the centre of the cling wrap.
3. Roll out the dough into a circle with a diameter of approximately 13 inches.
4. Place the dough in the pie plate—the cling wrap should ease the transfer.
5. Fold the dough so that it is anchored over the lip of the pie plate.
6. Perforate the pie bottom with a fork.
7. Cover the pie with tin foil and weight down the fin foil with the rice. This is to reduce the likelihood of air bubbles.
8. Bake crust for 15 minutes at 357 F.

THE TOP CRUMBLE
1. In a mixing bowl combine the rolled oats, the remaining dough, and flour.
2. Crumble the dough into small pieces. Gently mix the ingredients into a mealy texture.

THE GREAT COMBINE
1. Place filling in pie crust
2. Cover the top of the pie with the crumble. Pat down LIGHTLY.
3. Paint the top with the egg for a future golden hue.
4. Place in oven at 375 F for 40 minutes. As always, every oven is a little different so use your judgment before digging in. When the blue berries are bubbling and oozing a dark purple jelly—that’s a good sign.
5. Let cool.
6. DIG ON IN.


cuss this custard

1 Oct

yves had a box of fresh ontario peaches that were slowly giving up the ghost at the back of his fridge. so, tascha came over to help create a dying fruit pie. this was also the baking adventure that produced the ‘last leg blueberry pie’. i don’t think i’ll publish the recipe, since i think it still needs to be refined. i will, however, say three things.

1. if you want to peel peaches easily– submerge them in boiling water for about 3 minutes. remove the peaches and place them in an ice water bath. as quickly as your little bourgeoisie fingers will allow– peel off that peach pelt and revel with the glory of those naked beauties.

2. this is possibly the worst custard recipe ever. the result was more similar to a pudding than any custard i have ever encountered. funnily enough, when the pie was finished, it both looked and tasted like a pumpkin pie due to colouring and spicing.

3. trying to bake pastry in this humidity is an incredibly daunting task. the air was so oppressive yesterday that i developed a southern accent. it was too laborious to enunciate every consonant, and the vowels, like the butter, melted too quickly and became unwieldy.